Posts Tagged ‘chesterhill ohio’

Ox Tail Pizza with Cipollini and Bone Marrow

There I was just two weeks ago, minding my own pizza business, and in walked my Amish friends from Chesterhill, Ohio, Joe and Verna Hirshberger. I hadn’t had time as of late to travel the 30 minutes it took to go to their farm, so I was happy to see them.

“Hello John, we brought you the cipollini onions you requested.” Joe said in a mysterious sort of way. I instantly remembered telling Joe that I could use a few of these midget onions before the spring planting season.

“Great, just put them up here.” I pointed to the counter.

“I am afraid we will need much more room than that, John,” Verna said, chuckling.

“What?” I asked, as Joe left.

“You said that you could use any cipollinis that we could grow,” Verna replied as Joe came in the door with a huge box filled with the small red and white onions.

“Holy…aaa…” I cleared my throat in embarassment and horror. Wow, you were right,” I said. “That IS a lot of onions.”

“That’s not all.” Joe said and made 3 more trips, bringing the total to 80 pounds of cipollini onions.

“Wow.” It was all I could say. In my mind, I saw myself not only peeling these, one of the biggest pain- in-the-rear vegetables, for the rest of my life, but also saw that cartoon dollar bill sprout wings and flutter away from me. “Why so many?” I asked stupidly, remembering that the Amish in Chesterhill never do anything small. Joe explained that since he buys plants in bulk, that they had to buy numerous flats of the plants.

We haggled over price and they won (they always do.) After they left, I put the onions in two 55-gallon trash bags and have been braising, sauteeing, pickling, chopping, making salsa, carmelizing and just plain swearing. The only things I haven’t done with these sweet marbles of the onion world is juicing and sous vide.

When life hands you cipollinis, just make pizza. Here is an organic and local Pizza al Taglio that we sold last week: broccoli rabe, small sunburst tomatoes, and corolla potatoes with Manchego and Gruyere cheeses.

This is why they have made it on this Oxtail Pizza with Bone Marrow. It’s just meat from the ox tail, a small heaping of Gruyere, some thyme and that’s it. I must let you know that this was the most painful pizza to make because I hobbled around the kitchen with a cast on. My doctor said that I must stay off my feet, but what does he know? Sometimes pizza must take priority.

Lets make this fabulous pie! (Please note: I am using chicken stock and white wine instead of beef stock and red wine in this recipe because  do not want to contaminate any flavor nuance from the oxtails. To me, Beef stock and red wine tend to overpower a braise.)

Using the Easy Dough recipe, make two 7 ounce dough balls and freeze one for later use.

For the marrow bones: Put one quart of water with 4-5 tablespoons of kosher sea salt in a bowl. Stir to incorporatate.  Soak the marrow bones to extract as much blood as possible. Change the brine when when it gets cloudy. You may have to do this 2 or 3 times and this will take approximately 20 to 25 minutes. (We will come back to these after the braising of the oxtails.)

4 nice sized oxtails (the larger they are, the more meat you will get from them)

1/2 cup flour for dredging

2 tablespoons extra virgin olive oil

1 cup diced cipollini onion

1 cup chopped celery

1 cup chopped carrot

1 cup white wine

2 cups chicken stock

2 1/2 tablespoons tomato paste

4 cups water

Put the flour on a plate and add the salt and pepper, mix well. Dredge each oxtail in the flour, coating all. In a saute pan, heat 1 tablespoon olive oil on high heat. Just before the oil smokes, addthe oxtails. Turn to brown on all sides. Put the oxtail in a medium stockpot.

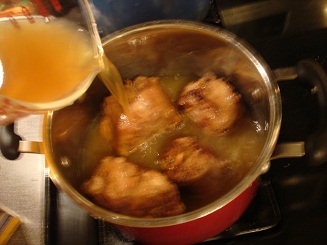
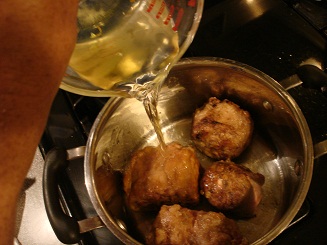
Pour the remaining 1 tablespoon of olive oil into the hot saute pan. Add the onion, celery and carrot. Turn the heat to medium. Turn the stockpot on high. When the oxtails start to sizzle, add the white wine and simmer for 4 minutes. Add the chicken stock to the oxtails and bring to a boil for 2 minutes.

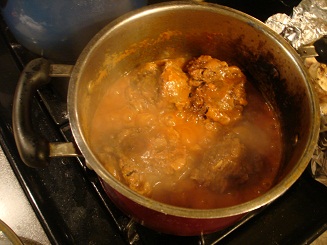
When the vegetables have sweated sufficiently, (they will be limp but still colorful), add them to the stockpot, then add the water. Turn the stockpot heat to high. Add the tomato paste and stir. As soon as the mix comes to a boil, turn to low and simmer. Cover and simmer for 2 hours until the meat is falling off the bone.

Back to the bone marrow.

Pre-heat oven to 35o degrees F. Take the bones out of the brine and place on a peice of foil. Add the cipollini onions to add fragrance to the marrow. Fold the foil up and place in the oven on the same saute pan you used before. Cook for 30 minutes and take out immediately. (Note: Do not overcook the bones. You will know they are overcooked when the marrow turns to liquid-oops!)

When the bones have cooled, use a thin sharp knife to gently scrape the marrow out of the bone. You can also press the marrow out from other end of the pipe. This is a delecate process, so take your time. Put on a plate and place in the fridge to harden.

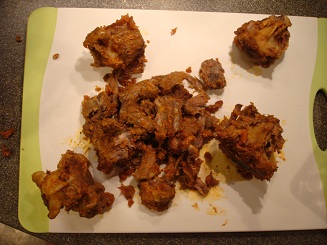
When the oxtail braise has sufficiently reduced and the meat is falling off the bone, take the tails out of what is left of the broth. (Strain the broth and season for a great soup for lunch.) Pick the meat off the bones, taking care to avoid any extraneous cartilage. Cut the meat with the grain into small matchsticks and reserve for the pizza.

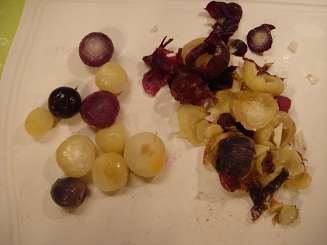
Take the skin off of the cipollinis and cut them in half.

To make the pizza:

1 7-ounce dough ball, formed into a disc

1 teaspoon extra virgin olive oil

Oxtail braised meat

1 cup Gruyere cheese

10 medium cipollini onions, sliced and roasted

Bone marrow that has been sliced lengthwise

1 tablespoon fresh thyme

Put the olive oil on the pizza dough and rub onto the inner part of the disc, not the outside crust. Place the oxtail meat, then the Gruyere, then the onions on the dough. Place in the oven, using a pizza peel dusted with semolina or cornmeal. Place on a pre-heated pizza stone or upturned, heavy cookie sheet. Here I used an Emile-Henry pizza stone that I had placed in the oven and preheated.

As soon as the pizza starts to turn golden brown, sprinkle the top with the fresh thyme and the marrow. If you put the marrow on too soon, it will turn to liquid. Cook until the marrow starts to warm.

This is the most spectacular pizza you’ll ever taste. It is worth the trouble.

Wild Yeast Pizza Levain (or Starter)

I’m so excited about this pizza and can’t help feeling like Dr. Frankenstein. I wanted to scream, “It’s aliiiiive,” just like Gene Wilder when this Pizza Margherita came out of the oven. Like when I see a crispy baguette or ciabatta finishing it’s bake in golden brown splender; it’s that feeling of triumphant finality that I made something from nothing, that I didn’t screw it up (again) and all the planning, hard work and patience paid off in spades.

Spelt bundled in a Chesterhill, Ohio field and Neal Cherry’s stellar grapes make the beginning of a great pizza.

I did this pizza because I’ve received numerous questions about using a naturally obtained yeast in a pizza crust recipe. Some people refer to a “Yeastless Pizza Recipe” but that really isn’t true because yeast is everywhere.  It’s one of the oldest known cultivated organisms and has been found by archeologists in 4000 year old egyptian bakeries.(Now that’s “Old School!”)

To create this pizza, I must first capture wild yeast and ferment it with 3 things, a warm environment, flour and water. The yeasts will multiply producing carbon dioxide, lactic acid and alcohol which will in turn change the texture and flavor of the dough. The gas raises the dough while the lactic acid adds the flavor. Capturing the gas in cells which can be seen in bread and pizza dough depends upon “The Gluten Net” that is formed by the strength of the flour.

So, this process of creation is fairly easy if you’ve got the time, temperature, yeast and flour.

This starter or “Levain” (the French call it), is also called “Chef” or “Mother.”  Any bread or pizza crust really does taste more complex, nutty, malty and buttery than straight commercially raised yeasted dough. It does though take time and patience to complete the baking cyle. But the reward is the knowledge that you made a natural product using the air, earth, water of this planet. How’s that for sustainability?

Most bakers use this starter and fortify it with commercially raised yeast but for this recipe, we are gonna take it to the limit, with only wild yeast!

I could get extremely technical about this dough but I don’t have the time. Plus I’m not qualified, If you wish to know all the technical aspects about bread, just get “The Bread Bakers Apprentice” by my baking hero Peter Reinhart. His blog is awesome also. You can also go to my freind Tony Gemignani’s International School of Pizza in San Francisco where you can learn from an 11 time World Champion pizza maker everything you need to know about pizza.

Right now I just want to show you a way to capture yeast from nature, encourage the yeast to grow and produce bubbles of gas and make a great pizza with it. This is what it entails.

Finding wild yeast: Raisons, Apples, Plums, Peaches, Nectarines, Grapes, and even vegetables offer a landing zone for wild yeasts. You will find alot of wild yeast just cruisin’ around the air but these fruit and vegetables are best at capturing as much yeast as will need to facilitate a rise out of your pizza dough. Remember, the acid in certain vegetables may kill the yeast.

Getting the yeast to activate: We will use the simple method of just putting the yeasted fruit in warm, uncontaminated tap water for a period of 3 to 4 days. Don’t be stupid and use modified bottled water thinking it to be more “pure.” We are reveling in nature here, using an organic micro-environment for out pizza benefit! Bottled water sucks.

Adding the flour to the yeasted water: We will work to slowly bring the yeast to life by offering it natural proteins and sugars to feed on. Please don’t use bleached flour, organic is better and half whole wheat will add to the flavor.

Patience is indeed a virtue: We will wait on natures time to witness our harnessing of the miracle of fermentation. (Hopefully while drinking a beer, which contains yeast also.)

Don’t worry if you stray off course a little: If you put too much water or flour in the recipe, don’t worry, I won’t tell. It’s all a learning experience. Just make sure you label stuff or you will find yourself screaming “Who threw my starter awayyyyyy!”

Use this starter forever: If you follow a simple plan of feeding and retarding your starter, you can keep it forever. My freind Matt Rapposelli has a starter that is almost 20 years old. Cool!

Recipe:

For the yeast capture:

Here the goon starts the warm water bath for the grapes. How many did he eat after this video? About 20,(the pig)

Start with about 3 to 4 cups local organic grapes (seeded or not) obtained from the wild or a grape grower that doesn’t spray chemicals on the fruit. Other fruit will suffice but I’ve found that the spherical nature of each grape seems to capture more wild yeast floating through the air than other fruits. (DO NOT WASH THE GRAPES)

Put the grapes in 3 cups of spring water. Squeeze some grapes in the water to offer the yeast sugars to eat. Leave using cheesecloth and a rubber band for 4 days. Stir each day. In the end, the mixture will smell like wine or a combination of weak balsamic vinegar and wine.

These are the grapes after 4 days.

Strain the mix, disgard the grapes. Keep the cheesecloth. Always leave the grape water out on the counter, not in the fridge.

For the Starter:

In a bowl, put 1 cup organic, unbleached bread flour (it has more protein than all purpose), 1 cup organic, whole wheat or spelt, half a cup grape-water mixture. Mix well and pour into a small container with the cheesecloth or a damp towel (the towel will be better for eliminating crust forming). Stir this mix every hour if you have the time, you will see it increasing in bulk and bubbles.

The first day of feeding:

Take the day-old flour and grape water combination, (it should be starting to bubble) and mix it and 1 cup bread flour and 1/2 cup of the grape water in a bowl. Stir, leave in the bowl or transfer to a clean container,cover and leave for 24 hours stirring every couple hours.

Second day of feeding:

Wow! The mixture will start to tell you that it is activating by the smell of fermentation and by the bubbles. I used plastic wrap because of all the yeast flying around my store, but you can use a wet rag or cheesecloth.

Repeat the same mix and measurements. Transfer to a clean container. After another 24 hours, this is what you will have. An active pre-ferment made by wild yeast.

Store this starter in the fridge in a covered container.

Feed your starter regularly, about 2 times a week. To feed it, take out one-third of the saved starter to add room and just add one cup of flour and enough water and stir well enough to make a thick sticky paste. Leave this at room temperature for 4 hours. Put it back in the fridge. If making a pizza or bread, always feed the starter about 12 to 24 hours out and leave it at room tempererat wiure.

If you forget to feed it, take it out of the fridge and coax it back to life by mixing flour and water into it. You can add a little beer to give it a kick, or a raison or two.

Please forgive me as my Three year-old has a fever tonight. Tomorrow, I will show you how I made the dough with this starter using no other yeast and the subsequent pizza.

Good night and don’t forget to feed your mother!